Set Up Fedora on a Raspberry Pi Cluster
First and foremost, I would like to thank @ColsonXu for giving me this opportunity to play with some Raspberry Pis. He had got a few Raspberry Pi 4’s and built a cluster with them for computing purposes, but there was nothing to compute until the morning when @mrdarcychen found an article about running Rosetta@home on Raspberry Pi from Fedora Magazine, and Colson approved the plan. I was able to take the job of installing software required to run Rosetta@home on the Raspberry Pis.
I did not ask Colson about this, but it seemed like he followed this MagPi article to set up the cluster. That post is good for people who want to use the official Raspberry Pi OS (formerly called Raspbian), but it is not applicable to Raspberry Pis that run Fedora. In this article, I will explain the equivalent ways of doing the tasks listed in that MagPi post on Fedora.
The Hardware
The cluster consisted of four Rasiberry Pi 4 Model B’s. They were connected to each other through an Ethernet switch, which supported Power over Ethernet (PoE), so USB-C power supplies were no longer necessary, and an Ethernet cable was the only cable connection needed for each Raspberry Pi. PoE on Raspberry Pi required an additional expansion HAT, and a PoE Ethernet switch was more expensive than an ordinary one, both of which increased the cost of the build but also made cable management easier.

Fedora vs. Raspberry Pi OS
When the cluster was given to me, the Raspberry Pis were running the Raspberry Pi OS, which was essentially Debian GNU/Linux with tweaks and customizations for Raspberry Pi.
The article about running Rosetta@home on Raspberry Pi was on Fedora Magazine, so of course it would use Fedora in the demo. The author was using Podman, Red Hat’s version of Docker, to run containers created from the BOINC client image. But I could use Docker to replace Podman, and Docker supported Raspberry Pi OS, so instead of installing Fedora, the first thing I did was to set up Docker on the existing operating system and run BOINC client in a container.
The problem is, Rosetta@home required a 64-bit environment. As of this article was written, the 64-bit version of Raspberry Pi OS was still under testing, and all nodes of the cluster were running the 32-bit version. Therefore, Rosetta@home complained about unsupported CPU architecture, although Raspberry Pi 4’s processor supports 64-bit.
For this reason, I decided to replace the Raspberry Pi OS installations with
Fedora aarch64 releases. Any GNU/Linux distribution that was supporting the
aarch64 architecture should work, but I selected Fedora because of my
familiarity with it.
Install Fedora
The Fedora Project had not officially stated that they support Raspberry Pi 4,
but I was able to install and boot the Fedora 32 Minimal aarch64 image on it.
You can download the image
here.
Because I had been using Fedora on my personal computer, I could use Fedora’s
arm-image-installer to write the image to SD cards. If you are using a
different operating system, don’t worry, there are still some options for you:
-
Follow this guide in Fedora’s documentation. It contains instructions for non-Fedora users.
-
If you are an advanced user and use another GNU/Linux distribution, you can download unpackaged
arm-image-installerfrom here and run it.
Both the Fedora Magazine article and Fedora documentation have detailed
instructions to use arm-image-installer, so I will not go into too many
details. Here is the command I used to write the image:
$ sudo arm-image-installer --image Fedora-Minimal-32-1.6.aarch64.raw.xz \
    --target=rpi4 --media=/dev/sdX --resizefs --norootpass \
    --addkey ~/.ssh/id_rsa.pub
Explanations on some command-line options:
-
--target=rpi4specifies that the installed image is to be used on a Raspberry Pi 4. -
The
--norootpassand--addkeyoptions allow you to remotely log into the system asrootwith your SSH key while preventingrootlogins with password. If you don’t have an SSH key on your machine yet, you can generate one by runningssh-keygen.
Don’t forget to write the image to every SD card you are using for the cluster!
Boot Into Fedora
After writing the image, insert the SD card into a Raspberry Pi. If you want to view the video output, connect the Raspberry Pi to a display now. Then, power up the board, and follow the on-screen instructions to log in.
If you decide to manage the cluster as a headless system as I did, which means you are not connecting it to a monitor, then just power up Raspberry Pi, connect it to Ethernet, and wait for about one minute to let it boot into the system. Fedora enables SSH by default, so as long as you know the IP address of the Raspberry Pi, you can log in remotely.
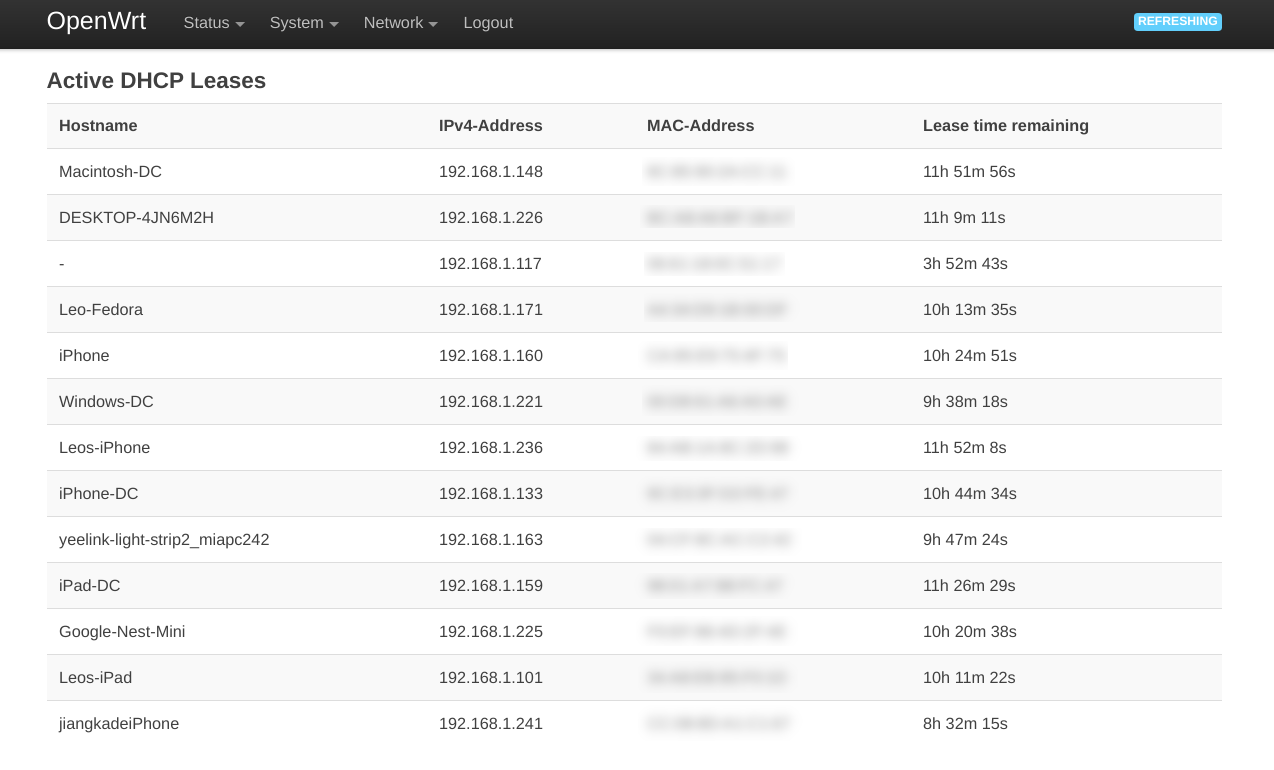
Most home routers allow you to see a list of connected devices in their configuration interface, and you can usually find the Raspberry Pi’s IP address over there. A piece of advice I would give to anyone who depend on this method to get the IP address is that you power up only one Raspberry Pi at a time, or else you will find multiple new IP addresses but cannot map them to the nodes in the cluster.
Once you get the Raspberry Pi’s IP address, log in via SSH using the root
user.
Change Host Name
The MagPi article recommends setting a unique host name for each node in the cluster. With host names, you can not only easily identify your Raspberry Pis from other devices in the same network but also know which specific node you have connected to.
One way to change the host name on Fedora is to edit the file /etc/hostname
and change its content to the host name you want to use.
Before I had overwritten the Raspberry Pi OS on the SD cards, the host names
had been set to Summit0, Summit1, Summit2 and Summit3, so I preserved
those names here. You can pick whatever host name you like and elect to number
the nodes from 1 rather than 0 as described by the MagPi article.
Connect to Wi-Fi
Fedora uses NetworkManager as the tool for managing both wired and wireless
network connections. To connect to a Wi-Fi network, first scan available Wi-Fi
connections with nmcli dev wifi. Press Q to quit the Wi-Fi network list,
and then connect to your Wi-Fi using this command:
# nmcli dev wifi connect <SSID> password <PASSWD>
Replace <SSID> with the name of your Wi-Fi and <PASSWD> with its password.
If you need to connect to a hidden Wi-Fi network, use this command instead:
# nmcli dev wifi connect <SSID> password <PASSWD> hidden yes
Set Static IP Address
The MagPi article suggests configuring the nodes to use static IP addresses in
the 10.0.0.0/24 subnet. This might be unnecessary if you can connect the
Raspberry Pi cluster to your router with a cable, but I will show you how to
accomplish this on Fedora anyway.
Note: It is strongly recommended that your Raspberry Pi has been already connected to a Wi-Fi network prior to this step. If you don’t have a monitor, and your Raspberry Pi is not connected to Wi-Fi, then you will lose access to the device. And, even if you have a monitor, reserving an IP address that is not in your router’s subnet prevents your Raspberry Pi from connecting to the network through Ethernet, so the Raspberry Pi will depend on Wi-Fi for Internet connection.
The following commands let Raspberry Pi use a static IPv4 address in
10.0.0.0/24 for Ethernet connection. Remember to change X in the IP address
within the first command to a suitable value.
# nmcli con mod 'Wired connection 1' ipv4.address 10.0.0.X/24
# nmcli con mod 'Wired connection 1' ipv4.method manual
From now on, if you want to connect to the Raspberry Pi via SSH, you need to
use the IP address obtained by the wlan0 interface, which is the Wi-Fi
adapter. You may check the wireless connection’s IP address either from your
router or with the ip addr command:
In the output, under wlan0, I could see a new IP address 192.168.1.160,
which I should use for subsequent SSH connections.
Once you have the IP address for the Wi-Fi adapter, reboot the Raspberry Pi. If you use SSH, try to connect to it using the new IP address.
Configure Firewall
This step is not required for Raspberry Pi OS and is thus not mentioned in the
MagPi article. But, because Fedora’s default firewall, firewalld, is more
restrictive, you need to add an exception rule here to prevent the firewall
from blocking communications between your Raspberry Pis.
Run
# firewall-cmd --zone=trusted --add-source=10.0.0.0/24 --permanent
to add the 10.0.0.0/24 subnet to the trusted zone of firewalld.
Connections in the trusted zone will always be accepted, so the nodes in your
cluster can communicate with each other.
After that, run
# systemctl restart firewalld
to restart the firewall. You may check if the rule takes effect with
# firewall-cmd --zone=trusted --list-all
Create a New Account for Daily Use
At this point, you have completed all of the networking set-up tasks, which
require root privilege. Using the root account for those tasks has helped
you avoid adding sudo before commands. However, using root for daily system
administration tasks is not recommended; a normal user account which can run
sudo is more preferable. Let us create a user called pi for this purpose.
Execute the following commands to add the new user and set a password for it:
# useradd pi
# passwd pi
On Fedora, allowing a user to run commands with sudo is as easy as adding the
user to the wheel group:
# usermod -aG wheel pi
Now, try to log in with the new pi user and run a command with sudo to see
if your configuration is correct.
Install MPI
Since the MagPi article uses Message Passing
Interface (MPI) for
parallel computing on the Raspberry Pi cluster, I am going to introduce how to
install it on Fedora as well. Fedora offers two implementations of MPI: Open
MPI and MPICH, both of which provides the mpiexec program for running a
command in parallel on multiple machines. I picked Open MPI by accident and
thus will show how to install it, but the installation steps should be the
same for MPICH.
The following command installs Open MPI itself:
$ sudo dnf install opemmpi
If you also want the Python bindings of MPI, then use this command instead:
$ sudo dnf install openmpi python3-mpi4py-openmpi
The mpiexec program is installed into /usr/lib64/openmpi/bin, a directory
that is not in the PATH environment variable, instead of /usr/bin. This
means that you must type in the full path to the program when you want to use
it, which is not convenient at all. To solve this problem, you can simply add
/usr/lib64/openmpi/bin to PATH by adding the following line to ~/.bashrc:
PATH="/usr/lib64/openmpi/bin:$PATH"After you have made the edit, apply the change with:
$ source ~/.bashrc
Now you should be able to run mpiexec directly, without typing in the full
path to the program.
If you wish to use MPICH in place of Open MPI, then simply replace all
occurrences of openmpi above with mpich:
$ sudo dnf install mpich
$ sudo dnf install mpich python3-mpi4py-mpich
PATH="/usr/lib64/mpich/bin:$PATH"After a brief trial of MPICH, I still preferred Open MPI to it because the
mpiexec program in Open MPI had clearer error messages.
Remove Password Prompt of sudo
When sudo is run, it asks you to enter your password and reads the keyboard
input from the terminal, unless if you have just run it a few minutes before.
Because mpiexec does not pass terminal input to the programs you run with it,
when you execute a sudo command using mpiexec, it cannot read your
password.
The workaround to this issue is allowing sudo to run commands without
password authentication. To do this, you need to modify sudo’s configuration
file by running
$ sudo visudo
and then making the following change:
 ## Allows people in group wheel to run all commands
-%wheel        ALL=(ALL)        ALL
+# %wheel        ALL=(ALL)        ALL

 ## Same thing without a password
-# %wheel        ALL=(ALL)        NOPASSWD: ALL
+%wheel        ALL=(ALL)        NOPASSWD: ALL
On Fedora, visudo uses vi as the text editor by default. In case you are
not familiar with vi, here are the operations for making the change:
-
Type
/wheeland pressEnter. This takes you to the line above the first line you should edit. -
Press
jto move the cursor down by one line, then pressShift-Ito go to the front of the line and start editing it. At this moment, you should see the-- INSERT --indicator at the bottom of the terminal. -
Enter
#so that the current line becomes a comment line. Now, pressEsc, and the-- INSERT --indicator should disappear. -
Press
jthree times to go down three lines, then press0to move the cursor to the line’s beginning. Now, pressxtwice to remove the#so the current line is no longer a comment. -
Type
:wqand pressEnterto save the file and exit the editor.
Repeat the Above Steps on Every Remaining Node
You have now finished the initial set-up tasks for a single node. Unfortunately, these steps need to be done on every node in your cluster. To review what you have performed, here is a summary of the set-up tasks:
- Write Fedora’s image to an SD card
- Boot the Raspberry Pi and obtain its IP address
- Connect the Raspberry Pi to a Wi-Fi network
- Set a static IP address
- Configure firewall on the Raspberry Pi
- Create a user account and add it to the
wheelgroup - Install MPI and set the
PATHenvironment variable - Remove
sudo’s password prompt
Please pay attention to the following things when you repeat those steps, as they will vary from node to node:
- The IP addresses of your Raspberry Pi might change
- You should use different host names for different nodes
- You also need to assign different static IP addresses to different nodes
When you are done, test if the Raspberry Pis can ping each other. If they
can, then those nodes have been successfully configured so they can
communicate, and you are ready to move on to the last step.
Create and Copy SSH Keys
The mpiexec program partly relies on SSH to communicate with other nodes in a
parallel job. When you connect to a remote host with the ssh command, you can
use your password for authentication if the host accepts it. For mpiexec,
however, it does not make sense to ask for your password. Suppose mpiexec
would let you enter your password, then for a Raspberry Pi cluster with four
nodes, you would have to type in your password three times; if you had more
nodes, the process would be even more tedious. To work around this issue, you
can generate some SSH keys and use them for authentication in place of
passwords.
First, select a node as the manager of the cluster. The rest of the nodes then
become the workers. The MagPi article suggests using the first node, whose IP
address is 10.0.0.1, as the manager node.
For each worker node, connect to it from the manager via SSH, and run the following commands:
$ ssh-keygen
$ ssh-copy-id 10.0.0.1
Press Enter for all questions asked by ssh-keygen so that the default
option will be used. In particular, do not set a passphrase for the key.
Next, on the manager node, execute ssh-keygen once as you did on the worker
nodes, and then run ssh-copy-id multiple times to copy the manager’s key to
each worker. Here are the commands I ran on the manager of this particular
cluster I was setting up. If you have assigned different IP addresses to your
Raspberry Pis or have a different number of nodes, then you should change these
commands accordingly.
$ ssh-keygen
$ ssh-copy-id 10.0.0.2
$ ssh-copy-id 10.0.0.3
$ ssh-copy-id 10.0.0.4
Done!
Now that the SSH keys are successfully created and configured, you are finally
ready to run programs in parallel with mpiexec. To test it, you can run the
following command:
$ mpiexec -n 4 --host 10.0.0.1,10.0.0.2,10.0.0.3,10.0.0.4 hostname
The -n option sets the number of nodes, and --host specifies the IP
addresses or host names of the nodes that will run the program. If you have a
different number of nodes or an alternative IP address configuration, then you
need to change the command based on your setup.
The expected output of the command is a list of your Raspberry Pis’ host names. The order of the host names are not deterministic, which is completely normal. As long as you can find all host names in any order, your configuration is correct.